Saturday, 23 September 2017

Gay Cats Rock!

Hello, Lovelies! I  can't believe it has been a whole month since I last posted. Lots has been happening though. I have been out and about with some friends from work. We went down to London to see the last day of the the Grayson Perry Exhibition, "The  Most Popular Art Exhibition Ever!" at the Serpentine Gallery.

Sketch from one of Grayson Perry's Notebooks
More about that later. Most excitingly I met  the gorgeous Vix and Jon who were trading at the Classic Car Boot Sale in King's Cross. Such style! I was gutted that it was only a flying visit on my part but I had split off from the rest. I still made it to the gallery before they did though.


Before we all met up, the advance guard were persuaded to go for quick detour to Walthamstow Market. Stupidly, I didn't take any photos while I was there but I did make a pilgrimage to the legendary "Man Outside Sainsbury's" (#TMOS). He had some great fabrics but I went for a wander and ended up not going back to the Tube the same way so never bought anything from his stall. I did buy 3 fabrics though. One from one of the shops on the left (didn't catch the name) and two from The Textile Centre.


The leopard chiffon and the camera fabric are from The Textile Centre. I bought 4 m of each. It wasn't even a tenner. Walthamstow may be my new happy place.


This gorgeous African wax fabric was £6 for 6 yards. There were so many there but funnily enough not too many designs that I liked. I was looking for yellow colours to go with some that my friend brought me back from Senegal but didn't find anything suitable..... this time. :)


I did take a few photos at the Serpentine. Speaking to the people at wok, Grayson Perry is a bit of a "Marmite" artist but I really like him and his work.


Detail from "Animal Spirit". I loved the crows.
He has a very perceptive view of life and a great sense of wry humour. as well as such technical skill in a wide range of media. Look at this ace quilted wall hanging.


I really enjoyed the Exhibition and was taken with the abundant cheeky squirrel population in Hyde Park and the flocks of parakeets. Quite surreal. It was a beautiful day.


Marriage Shrine - A beautiful homage to the Grayson' Perry's wife. I thought that this was so touching.
I have been sewing, ACTUAL sewing and have been spending any free time (haha!) between juggling work with trying to catch up with some creative things. I have bought my own body weight in vintage buttons and crafty stuff. Going to post more on that soon as I have BIG plans to update my work wardrobe with new me-made things. I have a pile cut out and ready to go so watch this space.

So have you got any sewing plans? Been out to any good exhibitions?Or have a favourite artist you would like to share? 

Later,  Lovelies. I am getting back to my sewing while I am on a roll!

Kxx

Sunday, 27 August 2017

Vintage Lingerie: My Sewcialists' Tribute in a Book Review plus How to Scale Up the Patterns and a Me-Made 1930's Girdle

Are you a Sewcialist? No matter what your answer is to that question it's been a whole lot of fun looking at the wonderful garments made by everyone taking part in August's Tribute Month. I really enjoyed the "Inspiration Post" series that ran in July and how those have panned out into some great garments. Lots of new-to-me sewing bloggers with such a wealth of talent.  


I am absolutely snowed under with work, even on this Bank Holiday weekend (which is why I am procrastinating writing a blog post) and just don't know just how much sewing I will be getting done any time soon so I am going to dedicate this book review as my Sewcialists'' Tribute to Elaine over at The Demented Fairy who makes the most bonkers, wonderful Steampunk-inspired costumes and "muggle" clothes. Honestly, I would kill for half this woman's wardrobe. 


It was her recent post on lingerie that got me thinking, so with my best multi-tasking hat on I will be reviewing Jill Salen's wonderful book, "Vintage Lingerie", sharing the resource that enabled me to scale-up the patterns to a wearable size and showing a couple of me-made girdles drafted from the pattern for a 1932 girdle in this book in a tribute to her "smalls"-making skills. 


This book, Jill Salen's "Vintage Lingerie: Historical Patterns and Techniques", and her corset one, are my go-to books if I want to sew some lingerie. 


The contents are in the format of an introduction followed by projects laid out as gorgeous colour photos of the garments which are culled from her own collection or from museums. The book ends with some very useful techniques.


There are 27 different projects in the book which makes this a very good buy even if you only make 2-3 of them as it is a wonderful resource.


Along with the photos are descriptions and a little history of the garments written in an informal, entertaining style. 


Each garment comes with  a double-page layout of the pattern drawn to a scale at either 1 square: 1 inch or 2:1 and require scaling up to the required size before use. 


This is the tricky part and will take a bit of patience, a decent ruler, french curves and a lot of swearing pattern paper. I drafted up the 1932 girdle pattern above to a modern size 8 using the measurements outlined in "Metric Pattern Cutting" by Winifred Aldrich as I was fitting models but you can use your own stats just as easily. 


I used the method of enlarging based on percentages that is found over at the Foundation Revealed website. The link can be found here. Seriously, this is probably the most useful thing that you will ever learn if you need to scale up these kind of patterns. This technique could probably be used to size-up just about anything. I really must have a go with a "proper" sewing pattern.
 Definitely, owe the author, Cathy Hay an eternal debt of gratitude for writing this guide.


The two things that are massively important: grain lines and balance points. Very handily marked on the patterns so remember to transfer them over. It will make a massive difference to the success of your garments. 


Also, boring I know but you will need to make a toile, unless you are very brave and trust your drafting (or very lucky and fit into the original garment measurements).

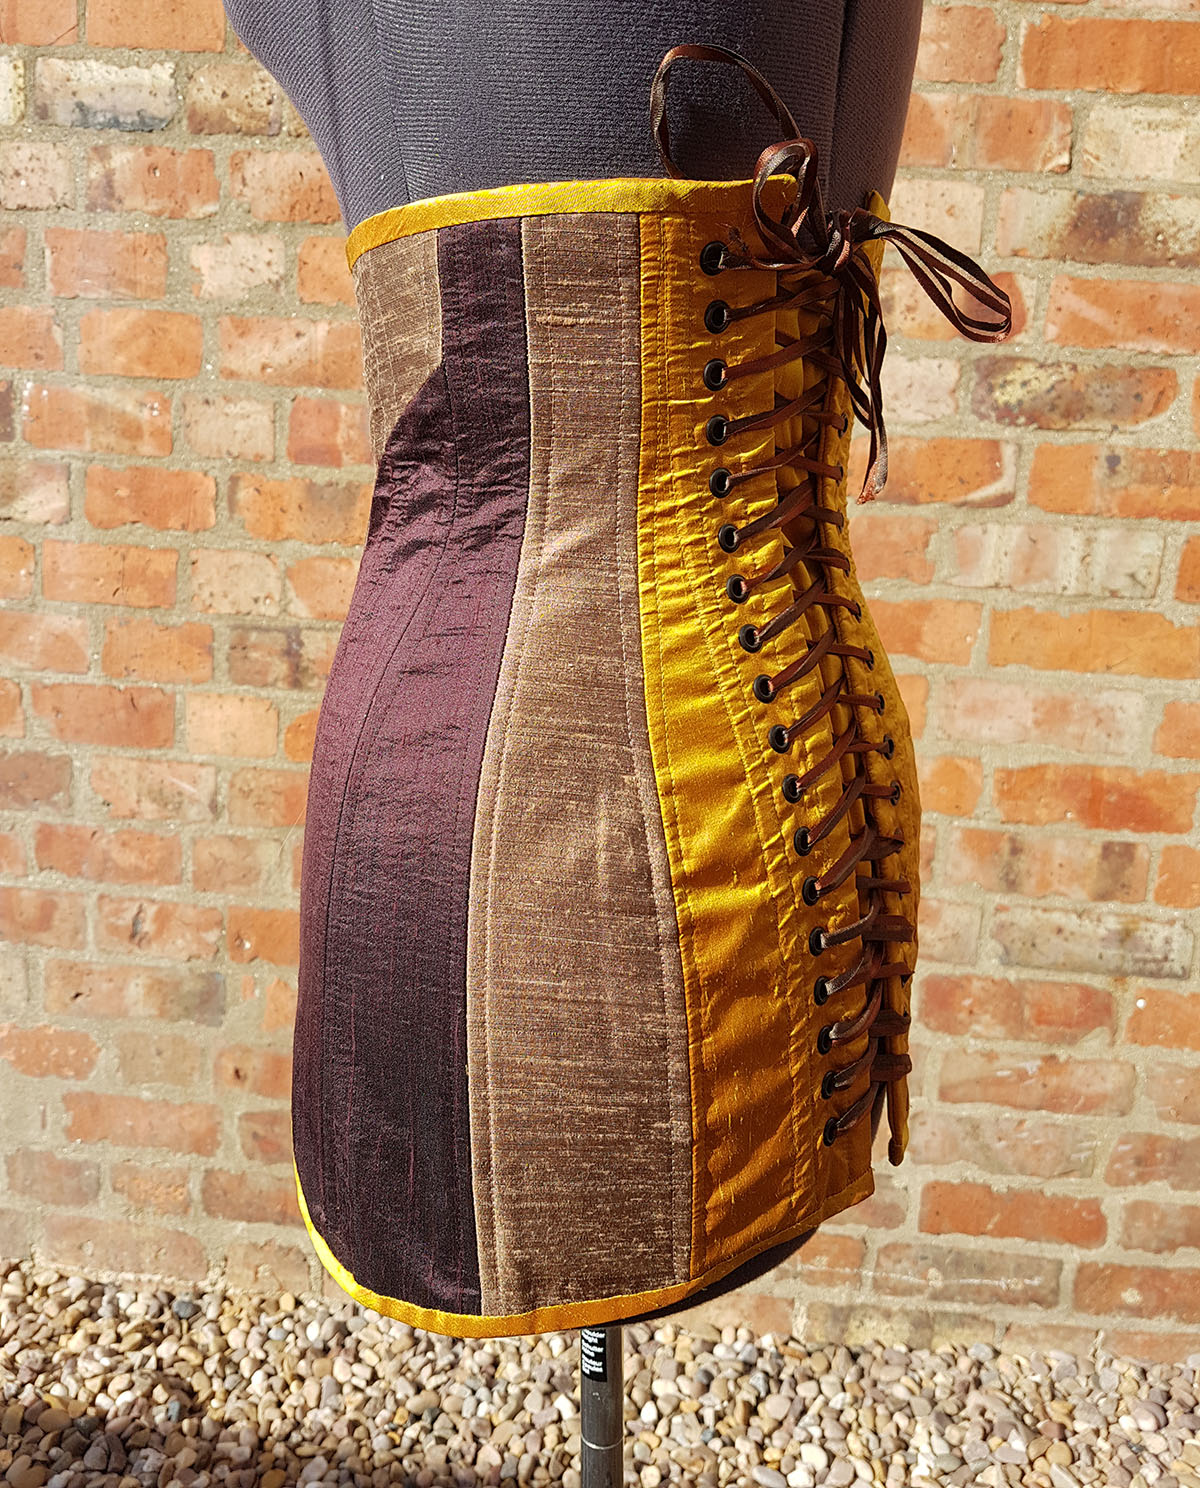
So how did my attempts turn out? I think pretty well. I loved sewing these girdles. They are made of an outer fabric of silk duping flatlined to corset coutil and lined in my trademark quilting cotton colourful linings.


I still haven't finished these girdles as they need their suspenders on the bottom so could be considered UFO's.  I also have no idea where to buy the little hooks and eyes that are stamped through the front of the girdles so the bottoms still need some sort of closure above where the suspenders are. I could have used eyelets but they might be a bit of a faff to get on and off then.  A longer busk would have been very unfortunate when you sat down.... ooft!


I do love the lines. They look much better on. If they look a bit collapsed in the rear on my dress form this is because they need a rounded bum to fill them out. These girdles would give you an fantastic shape and would look ace lengthened into a corset dress. No idea how comfy they would be wearing them all day but shaped like that who would care?

So have you taken part in Tribute Month? Do you admire someone's sewing skills or (bonkers) pattern choices? Do you like historical sewing?

Hope that life isn't totally pants, lovelies! (groan)
Kxx


N.B. Just for the sake of clarity I don't own the pics from the book. I bought it with my own money and would gladly recommend anyone with a passion for vintage lingerie to do the same. I also made my girdles a couple of years ago...... but hey who is counting?

Thursday, 9 June 2016

Book Review: "The Great British Sewing Bee: From Stitch to Style".

You would have to be living underneath a rock to not know that the new series of TGBSB is back on the telly (or BBC iPlayer if you are like me). And as with every popular BBC series there is also an accompanying book - "From Stitch to Style".


This book follows the same format as the last, a hardback book supplemented with a separate cardboard pack containing all the pattern sheets.
After comparing the contents there is a little repetition - basic sewing kit, how to use the patterns and some fitting advice. Considering that this book would probably be used as a stand-alone then this is not really an issue.

Apart from the intro, the book is divided up into three chapters:


Chapter One: Foundation - which covers some core sewing skills (simple seams and seam finishes, interfacings, elastic casings, exposed and surface mounted zips, appliquĂ©, sewing with sticky/slippery fabrics and fabric ties and Rouleau loops)  and includes patterns for the "Bias Cut Top" featured on Episode One of the new series, and A-line child's skirt, a pretty natty jumpsuit (as modelled by a very lovely older model), the babygrow featured on the show, a child's cape and a unisex kimono.


Chapter Two: Inspiration - Which has a load of patterns and their corresponding hacks and some additional core skills (invisible zips, blind hemming, pleats, lapped zips, bias binding, lining and darts)

Chapter Three: Exploration - Which has even more patterns, including the soft-cup bra pattern and a very nice "Drape, Drape" -style asymmetric jersey top, related hacks and more core skills (snap fasteners, sewing with stretch fabrics, sewing with lace, pin tucking and buttonholes).


The sizing is quite inclusive and goes from a size 8 to a size 20, which is about a 45 1/2-inch bust so lots of FBA-action for me! It's even got a page of style advice broken down into rectangles, pears, inverted triangles, apples and hourglasses.  Don't know if I agree with all that nonsense as I think you should be able to wear what the hell you want but it is there if you fancy a look-see.

There are a few children's patterns, a couple for men (shirt, cycle top), with the majority for women including some lingerie.

To round up, this book is really well worth the purchase price. I paid a tenner for it in our local big supermarket chain but it is available on Amazon for the cost of a Big 4 sewing pattern (unless you are in the US of course. Damn those 99 cent sales!).  You get a whole wheen of patterns, some good ideas to hack them and some simple and well-illustrated sewing techniques and advice. I was so underwhelmed by the first two books in this series but am so happy to have bought this and the last book,  "Fashion with Fabric". Between the two of them you have some great patterns and enough info to hold your hand.


In other news, Sprogzilla and I have been out and about taking advantage of the lovely weather and the festival that is on in the West End of Glasgow at the moment. I love this pic of my wee chicken, she is rocking her mermaid hair.
Hope that you are all having lovely weeks and enjoying life wherever you are!
Kxx

DISCLAIMER: Just for the sake of transparency I bought this book using my own hard-earned. All comments are most definitely personal ramblings of my stitch-crazed mind. 

Thursday, 23 April 2015

Me-Made Corset as shot by Christeeny

I am the luckiest woman alive to have so many uber-talented friends. One of them is the lovely Chris Patterson, who is a fabulous photographer and all round artistic genius based in the North East of England and fellow studio resident.  Last week she was shooting with the very beautiful Lucy Bennison from Tyne Tees Models and I loaned her a few me-made bits and bobs for the shoot. Just look at the result! Isn't this image just amazing? 

Team


Model : Lucy Bennison Tyne Tees Models
Corset & Head Piece : Bad Kitty Corsets

Photo Credit: Christeeny.com

I know that Chris was trying to go for a painterly feel and the use of light in this shot, to me, is very much like Vermeer or Rembrandt. I was so pleased that one of my me-made (and designed) corsets could be of use along with this 1920's/ early 30's wax flower bridal crown and veil from my rainy day collection of "stuff that might come in handy for a photoshoot". The tulle is so delicate, almost disintegrating to the touch but very beautiful.

Anyway, I was bursting to share this image with you but had to wait until Chris very graciously said it was okay. If you would like to see more of her work then please click on the link above to her website or find her on Facebook.

Not forgetting of course the amazing team of MUA and hairdressing whose links can be found above too.

Apparently there are more images to come (using other me-made corsets) and I hope to be able to share those with you too sometime. If you are interested the corset design is derived from an original line drawing in "Corsets & Crinolines" by Norah Waugh. I have used this pattern a few times now, most notably for my dip-dyed silk corset that I must get some pics of too.

Hope that you are all having a great week!

Kxx


Thursday, 27 November 2014

Vintage Book Review: McCall's Sewing in Colour (1964)

To be honest my life is overrun with books. Since I was a tiny child (I learned to read very early) I have been a voracious reader, devouring every tome that I could lay my grubby little hands on. Since then not a lot has changed - still got the grubby hands - except I no longer scare myself with books of ghost stories just buy mostly sewing books. I have quite a few now and like to pick them up on my travels as often as I can. 

McCall's vintage sewing - written when brown polyester ruled the world

My copy of  "McCall's Sewing in Colour" is from 1964. I picked it up on eBay for a song. It is quite a thick hardback book, about 300 pages, and as the tag line states covers " Home Dressmaking, Tailoring, Mending and Soft Furnishings". There are lots of line drawings and several colour plates with great photos.

60's sheets for the win!

The contents of this book are a bit different to some others that I own from the same period. There is a lot of emphasis at the beginning of the book on picking the right pattern for your lifestyle and figure type which just goes to show that nothing much changes, even from 50 years ago. We were still fretting about whether a pattern would be right or not. There is even the age old discussion about stripes. I love a horizontal stripe and wear them often. Ain't nothing going to make me look smaller so might just go with it. I want to be stripey!


Would our bums look big in those spots?


There is quite a lot of pages on choosing fabrics. This is useful and I suppose that apart from fit it is one of the major culprits in pattern failure. Plus a section on colour.

I am in love with this colour palette. No black too. Very strange

To give you a flavour of the book the chapters headings are listed as:

1) Building a New You
2) Keystone to Fashion
3) The Raw Materials


4) Fabric Facts

Yes, I keep my stash in my spice cupboard.

5) The Tools of the Trade
6) The Easy Rules of Pattern Alteration
7) Groundwork for Action

Feelin' hot, hot hot!

8) Blueprint for the Professional
9) Construction Data - Stitches and Seams
10) Construction Data
11) Design Details
12) Important Closings
13) The Personal Touch


14) Tailoring Talk
15) The Three R's- Repairing, Remodelling and Remaking
16) The Decorator's Touch

My eyes! It burns my eyes! Could you sleep in this room?

So the big question is would I buy this again? The answer is yes. There are better books with regard to sewing process tuition and the styling is obviously from the land that Pinterest forgot but it is a nice read and I am glad that I bought it.There is something in this book for everyone, beginners and seasoned hands alike and not a "how to a make a pillowcase" or pair of PJ pants to be found. Something a lot of modern books should keep in mind. There is a lot of info to be had in sewing books from this era, especially if you want to take your techniques to the next level, and you could easily buy two or three for the costs of one new one. Plus, I think reading these old books is fun but then again I read sewing patterns on the train!

Hope you are having the best time.

K xx


Sunday, 28 September 2014

Review/Tutorial: Prym Bias Binding Tool, Me-Made Corsetry Plus Some Sneaky Sewing Time

 Bear with me sewing people. This post is going to be quite long as it has some sewing with loads of pics plus a product review for a tool that I find to be one of the most useful that I own. Now to start off I was at the Studio yesterday and managed to sneak in a  little sewing time, in between moving furniture and mini-meetings.

Totally rocking shot  of Lois Wetherup by the awesome  Tom Farmer @ Glasgow Photographer, Knickers and fascinator by the super-taleneted Marie @ Amuse Bouche. Corset by me.

There is much going on at the moment, everything is in a state of flux, so loads to do.

Recognize this fabric? Yep, it is the leftovers from my Flea Market Fancy shirt. Nothing wasted in Kitty Towers.

More on that when it is all finalized. However despite all the too-ing and fro-ing I managed to complete the lining for the orange neck corset and make the outer and lining for a red one.

Lovely super thick silk, so many pieces.

The red one will match the corset above that I was commissioned to make for a Miss Scotland to be featured in a Christmas-themed shoot for The Sun newspaper a year or so ago. I am trying not to look at my wrinkly fabric. Nice fit though for only having the rough measurements.

I am going to use the two of these in the upcoming photo-shoot and am looking forward to getting them finished. I have to say that making a neck corset probably takes me as long as making a bigger one.

I always line in quilting cottons. They are so pretty and the cotton is nice to wear next to the skin.

My pattern has 12 pieces to cut out in the outer silk fabric, interfacing, corset coutil and then a lining. the shell is sewn up from the interfaced silk flat-lined to the coutil. The boning is sewn to the shell and the lining will be hand-stitched onto that to keep it in place. They don't lie flat as they are both shaped to be three-dimensional. Plus I will steam them into shape and leave them to cool down in the same way that you would do a coat collar.

Once that is done I will  tidy up the edges and cover them with bias binding, sandwiching all the layers together and unpicking the holding stitches. This is where one of my favorite wee gadgets comes in - my Prym bias binding tool.

NB.To be fair I also have ones from Clover and they are equally as useful but this is the one I will always reach for first as I like the little handle and the size.

One of my favourite tools, ever!

The tools are simplicity itself to use and they come with pretty good instructions but here is my method.

Here are my bias strips. I have ironed them flat. Look how the grain is on the diagonal. That is the bias and will allow it to curve round edges easily.

You will want to cut out strips ON THE BIAS that are twice the width as stated on the tool e.g for a 12mm tool cut 24mm, for an 18mm tool cut 36mm, etc. If I am using silk (as I am here) I cut out 40mm strips instead of 36mm just because they will shrink widthways when you pull them through the maker. You won't need to do this with a thicker fabric like cotton.

Plus you need to be quite accurate in your cutting or your will get wonky binding.

The back of the tool. Right side of fabric facing this way.

An easy way to get your first cutting line is to fold over one end of your fabric so that the selvedge is at 90 degrees to the selvedge on the other side to form a right-angled triangle. Give this an iron and, hey-ho, your cutting line. The pointy ends of your strips make it easy to push through the maker but if they don't you can pull it through gently with a pin.
To make your binding you will need to push your fabric through the tool with the right side facing downwards. The fabric will be folded round as it goes through to create the little flaps on the back of the bias as illustrated below.

Please ignore the stray thread. Never noticed that one when I was taking the pic.

It helps to secure the end of your strip to your ironing board with a pin so that you can pull against it gently when you are ironing. Use loads of steam (test your fabric first) and keep the point of the iron quite close to where the binding comes out. you should then end up with beautiful "single-fold" flat binding that you can either use as is or iron over double to create "double-fold" tape.

Easy peasy! Now you have no excuse for finding matching binding, plus the design options are endless. I really recommend buying one of these if you use binding at all. They come in lots of widths too and are only about £7 or £8 depending on size & brand.

Apologies for the wonky photo editing and hopefully will have a few more things to show next week.
Take care,  lovelies!
Kxx

P.S. I won a sewing pattern  giveaway from the brilliant "Pendle Stitches" blog so will be making a much needed bag at some point. Huge thanks for the pattern. Am chuffed to bits. xx


Disclaimer: The views above are totally my own and this is definitely not a sponsored post.